

If you are into high-end home theater, check out our Display and Audio Calibration Guides to maximize your experience.
It time to calibrate my baffle wall with the SHC sound system!
What’s New
The most significant upgrade to my room is now complete, with the front soundstage being upgraded to the LCR10 and SUB15. Now let’s see how they perform!
For context, I have also made several other improvements throughout the room which prompted me to carry out a full audio and video calibration. This article will focus specifically on the setup and calibration of the baffle wall. There will be more articles in the future regarding integrating these other upgrades.
List of changes/additions
- Replaced old Front Right, Left, and Center channels with the LCR10 1M height
- Replaced SVS PB10-NSD and SVS PB12-NSD models with 2X SUB15 (as part of the baffle wall)
- Replaced two 10″ subs in the rear with 2X Driver 15″ Nearfield Sub for my two main positions
- Moved my seats closer by 20 cm (8″) to get out of an 80 Hz room mode
- Replaced my Non-Acoustically Transparent screen with an Acoustically Transparent one (XYScreens Soundmax 4K)
- Slightly adjusted the positions/aim of all surrounds

Baffle Wall Setup
For those unfamiliar with an Infinite Baffle Wall, this design, pioneered by Krix in the 1980s for commercial cinemas, prevents sound waves from wrapping around speakers and bouncing off walls, which can interfere with direct sound and reduce clarity. By directing sound along the wall’s face, it improves midrange and upper bass clarity, smooths frequency response, and enhances dialogue clarity. Originally for commercial use, this technology is now available for home theaters, with Krix’s MX Series leading the way.
Horizontal Placement
When it came to positioning the LCR10s and the SUB15 in a baffle wall, the horizontal placement was straightforward. I started by placing the center channel directly in the middle of the screen. Next, I positioned each subwoofer to the sides of the center channel, followed by the left and right speakers next to the subs. I made sure all speakers were as close together as possible, without any gaps. This setup effectively creates an infinite baffle, which is the ultimate goal.
Speaker Height
I have to confess – I didn’t initially set up my baffle wall correctly. At first, my speakers were positioned 8 inches (20 cm) lower, as I thought this would provide the best sound.
When I was planning my baffle wall, I aimed to position the acoustical center as close to ear height as possible, aligning with standard speaker placement guidelines. This led to my speakers being located in the bottom third of my screen due to my screen being mounted a little higher than optimal. At the time, I believed this would be close enough to the middle to effectively anchor the sound to the screen as well.
However, I couldn’t have been more wrong. Once I started watching content, I noticed the sound still seemed to come from the speakers rather than from the actors’ mouths. Realizing this, I decided to raise my speakers by 8 inches (20 cm), placing them in the middle third of the screen.
Original Height

Final Height

At first glance, one might think an 8 inch height adjustment from 12.5 feet away wouldn’t make a noticeable difference in sound coherence with the image, but you would be mistaken. Once the speakers were raised, even without calibration, the sound truly felt as though it was coming directly from the actors. I was amazed at how much the audio perception improved just by raising them. My advice: if you’re placing speakers behind your screen, make sure they’re within that middle third for the best effect.
Baffle Wall Treatment
A baffle wall is most effective when the speakers span the entire width and height of the enclave. The goal is to stop the sound from bouncing off of the front wall and interfering with the direct sound. However, achieving this typically requires building an enclave into the wall that is exactly the size of the speakers, which wasn’t an option for my theater. Instead, I chose the next best option: filling the entire faux wall with acoustic treatment.
I filled the wall with 7 to 12 inches of foam that I was able to acquire for free. Ideally, it would have been better to use NRC-rated material, such as insulation, or commercial acoustic foam, but I had to work within my budget. Despite this, there is still a vast improvement in the sound and decay time over having nothing there at all.
Additionally, as you can see in the pictures, I’ve applied acoustic treatment to the front of the speakers as well. I used 0.4 inch thick acoustic paneling with cutouts for the drivers and ports. This helps reduce sound reflections, improving both clarity and decay time.
Bass Driver Location
After building the SUB15, I had two possible locations for each subwoofer driver; either in the upper or lower position within their columns. Knowing that bass performance is highly dependent on placement, I tested various configurations to determine the best setup.
I conducted test sweeps at each of my seats for each sub driver location, both with them individually and combined, without applying any delay settings. This approach was to ensure I achieved the best natural, raw response from the subwoofers before applying EQ. The better the response beforehand, the less work is needed during the EQ process and also the less introduction of audio artifacts due to EQ.
I found that placing the drivers at opposite heights worked best for my room, providing the most even coverage across all seating positions. I recommend that anyone setting up the SUB15 as part of a baffle wall conduct similar tests to determine the optimal configuration for their room.
Subwoofer Connections
For clarity moving forward, I thought it would be helpful to explain how my subwoofers are wired. I have two independent subs in the front, both SUB15 102L, and a third subwoofer with two 15″ SQL Series 2 drivers acting as a single virtual nearfield subwoofer directly behind my seat.
Sub Pre Out 1 from my AVR is connected to input 1 on my MiniDSP, which independently feeds each SUB15. Sub Pre Out 2 from the AVR is connected to input 2 on the MiniDSP, which controls the virtual nearfield subwoofer (VNF) and my tactile transducers. This article will focus solely on calibrating the SUB15s, with a follow-up to come covering integrating the nearfield subwoofer and tactile transducers.

Calibration
Now that I had everything set up it was finally time to start the calibration process, which always starts with the bass.
MSO
For years, I have been using Multi Sub Optimizer (MSO) to help calibrate my theater. This is a powerful tool that can calculate the exact gain, delay, and PEQ filters for speakers in the modal region, under 200 Hz. You can learn more about MSO and how it works in our review Multi Sub Optimizer (MSO) Review.
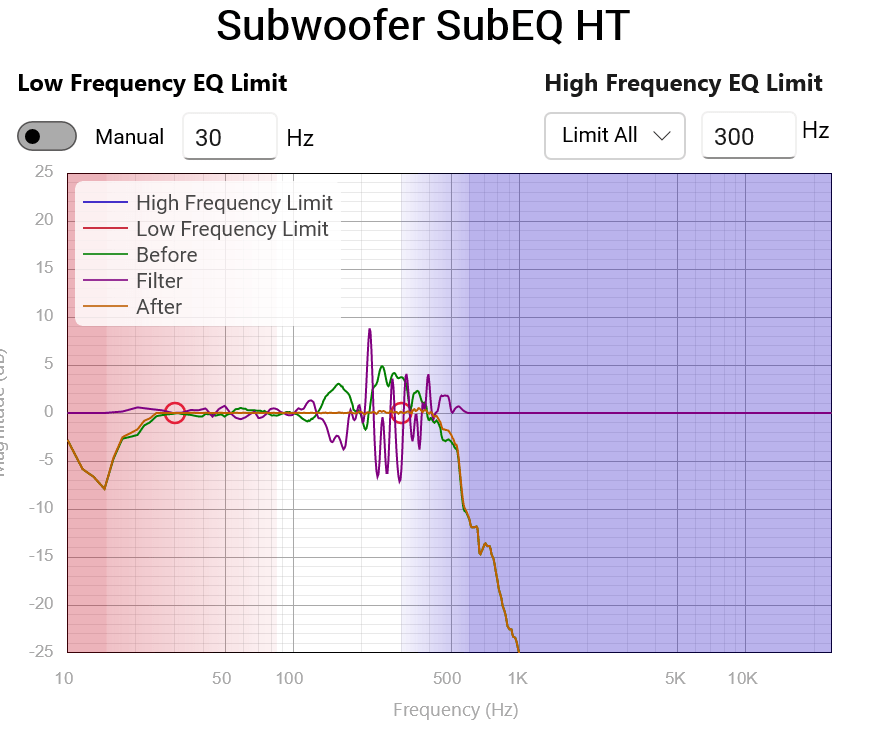
Based on my initial measurements, I constrained MSO to optimize between 18 and 180 Hz. Due to the high-pass filter protecting the 102L SUB15 at low frequencies, I avoided applying any EQ below 18 Hz. Additionally, I have a significant null around 14 Hz in my room, which I believe is due to the room’s construction. This dip persists regardless of where the subs are placed, so I opted not to apply any EQ in that region otherwise I would give up a lot of headroom. Above 180 Hz, I leave that to Audyssey to correct.
I also opted for a flat response in MSO, as I typically don’t apply a ‘house curve’ to my bass since I use Dynamic EQ. Occasionally, I might add a very slight tilt on top of Dynamic EQ for content where I want extra bass, but I don’t include that in my MSO configurations.
Here is the before and after of the MSO results for the baffle wall subs.


The results were excellent, with only a 1.24ms delay between the subwoofers, which makes sense since my MLP is about 1 foot off-center from the screen. I achieved a seat-to-seat variation of 1 dB and an MLP error of 0.61, using 4 independent filters and 4 shared filters, as the shared filters were needed to run the maximize SPL function in MSO 2.0. The key with MSO is not to get carried away with using as many filters as possible, since using more filters can introduce time domain issues. It’s best to aim for good results with the fewest filters possible.
This isn’t the overall response of all my subwoofers. As I mentioned, I have a nearfield subwoofer that I added, which is not included in this MSO optimization. I’ll explain why in another article, as integrating the nearfield subwoofer was more challenging than it seemed.
MultiEQ-X
Once the bass was corrected and all the subwoofers were integrated, it was time to run room correction. I used to rely on the Audyssey phone app to take the measurements and then I would edit the code to correct both the delays and response curve, but with the recent updates and new features in MultiEQ-X, I decided it was worth the investment. For thoroughness, I also ran Audyssey with just the phone app to make sure it detected and treated the speakers consistently.
For my measurements, I followed the tight pattern from the Secrets of Audyssey Pro Guide, as it works best for my room and I’m the primary user responsible for the audio quality in the theater.
Audyssey Target Curve
For me, the High Frequency Roll-Off #1 has the right amount of roll-off that, combined with Dynamic EQ, keeps the detail in the high frequencies without them being overpowering. I aim for all of my speakers to be within the standard ±3 dB of this curve.

Overall, this curve is the best sounding to me after all of the testing I’ve done. Keep in mind though, this is my preference for my room and my ears, so it may not necessarily work for others using the LCR10 and SUB15.
On a side note, to better match the tonal characteristics of my speakers, since my surrounds are currently not from the SHC line as the SHC SUR10 and SUR08 are still in development, I created a roll-off to align with the natural 16 kHz roll-off of the LCR10.
MultiEQ-X Result
After setting the target curve, it was time to configure the filter frequency range for the speakers. Since this was my first experience using the new filter smoothing function in MultiEQ-X, I wasn’t quite sure what the optimal settings would be. As such, I spent some time testing various frequency limits where the smoothing function would apply, as well as different levels of smoothing strength.
After extensive testing, I settled on the settings below, which provided the best compromise between accuracy, maintaining the speakers’ tonality, and avoiding sharp boosts. This was particularly important for me, as I’m sensitive to sharp filtering in the high-frequency region.


Crossover
Audyssey initially set my LCR10s to a 40 Hz crossover. However, we recommend setting the crossover between 60-80 Hz for LCR10s if using the 60L version. Since these are the first home theater speakers I’ve owned that can be crossed over below 80 Hz, I decided to test both the 60 Hz and 80 Hz crossovers after ensuring a smooth frequency response in each range.
During my listening tests, I appreciated both crossover points for different reasons. The 80 Hz crossover provided more overall bass impact, while the 60 Hz crossover anchored male voices more firmly to the speakers, as opposed to the more omnipresent sound with the 80 Hz setting. This left me torn between the enhanced bass impact of the 80 Hz crossover and the vocal accuracy of the 60 Hz setting.
To compensate for the slightly reduced bass impact with the 60 Hz crossover, I experimented with raising the subwoofer level. I found that increasing it by about 2 dB restored the impact without causing male voice bleed from the bass management.
My theory is that by crossing the speakers lower, I reduced overall air displacement in the room, and therefore reduced the tactile feeling from the bass. By raising the subwoofer level by 2 dB, I was able to bring back the tactile feeling without sacrificing the anchoring of male voices to the LCRs.
In the end, I chose a 60 Hz crossover with slightly raised bass, which provided the best balance of impact and vocal clarity.
REW Verification
Throughout my calibration process, especially after room correction, I always like to confirm the results with REW, starting with the center channel since it is the most important for movie watching. Main areas of focus are the crossover region, ±3 dB frequency response region, decay time, and group delay for bass region.
LFE Results
Starting with the final LFE response, the response curve is very flat but elevated above the 85 dB target. As explained in the crossover section, the slight decrease in impact I noticed when switching to a 60 Hz crossover was compensated by increasing the bass level by 2 dB. If we lower the line by 2 dB, it stays well within our ±3 dB target range for most of the frequency spectrum from 10-200 Hz. The only area that falls outside this range is between 12-17 Hz, which is due to a room null.

I personally prefer a slightly elevated response curve for the bass region because I enjoy the extra impact and presence that a boosted bass provides. This is in addition to using Dynamic EQ for loudness compensation. To achieve this, I further increased the subwoofer trim by 1 or 2 dB. During my tests with this setup, I found that increasing it by only one more decibel was the sweet spot.

For reference my noise floor of my room is 36dB.
The waterfall plot is used to show how quickly each frequency decays. In a home theater, the ideal scenario is for sound energy to decay quickly and evenly. The exact speed of decay depends on the room size, but a general guideline is to aim for a decay time between 250 ms and 400 ms. The waterfall plot can also help identify any ringing at specific frequencies, which would appear as ridges in the plot.
In the measurements taken from my room, there are no significant ridges above 20 Hz, and no ridges near the peak energy, which is a positive result. This indicates that no bass frequencies are overly corrected, leading to clear, non-muddy bass, allowing each new note to be distinct. There is some lingering energy, sound that is above the noise floor after 400ms, starting at 30 Hz and below, but this is expected due to the difficulty in controlling ultra-low frequencies, given their long wavelengths. Overall, I’m very pleased with these results. Having sealed subs, along with the correct amount of DSP, has dramatically improved my decay time.

When examining the spectrogram to assess the time arrival of peak energy at each frequency (group delay), the ideal scenario would be a perfectly flat dashed line. This would indicate that all frequencies reach the microphone simultaneously; however, this is not realistically achievable. Instead, the goal is to have a smooth line that gradually increases in peak energy time as the frequency lowers.
In the measurements taken from my room, you can see this gradual increase. The line remains fairly flat until about 50 Hz, after which it slowly rises down to 10 Hz. Again, I am very happy with these results as the group delay is very low even for the subsonic region, which is very impressive. This results in the bass sounding very clear and distinct, without any muddiness.
LCR Results
Once I was satisfied with the LFE response, I shifted my focus to the main speakers. To verify the full-range response of the LCRs, I typically average the first three measurements to save time, rather than spending hours calibrating by measuring all of the same locations used for Audyssey. For verifying decay time and group delay, I only use the MLP position, as you can only assess these parameters effectively from a single location.
Starting with the frequency response, the speakers are within the ±3 dB target curve above the crossover region, meaning each frequency should be heard at roughly the same level. The bass is elevated for the reasons explained earlier. Additionally, the crossover region is smooth with no dip or peak in the response.
Since I enjoyed the natural sound of these speakers without calibration, I aimed to balance accuracy; how closely the response matches the target line, without losing too much of the speakers’ natural character. I settled on the response below, achieving the typical ±3 dB target shape without excessive over-correction, which would compromise the speakers’ natural sound.

Overall, the waterfall plots show decent results with some minor issues. There is no major ringing below the 200 Hz region, which is great. This also means the crossover region is blended smoothly. However, above that, the graph becomes less straightforward, indicating potential issues. These should be visible in the spectrogram graph.


The spectrogram shows a gradual and positive increase below 120 Hz across all speakers. However, some issues start to emerge above that range, particularly with the center channel. There is a slight phase or timing issue around 130 Hz, and noticeable peaks in the 200-400 Hz range, which slightly degrade the clarity of female vocals compared to male vocals.


These large group delays appear to be a result of Audyssey correcting nulls for the right and center channels between the 200-400 Hz region. This suggests that a room mode is present at the MLP, as the speaker’s nearfield measurement does not show this dip. There are a couple of possible ways to fix this. One potential solution is to adjust the target curve by inserting a dip of 1-2 dB in that area to see if it helps reduce the group delay, as a reduction of 1-2 dB should not shift the tonal balance of the sound. However, if that doesn’t work, further investigation will be necessary to try to eliminate the resonance in that area. Additionally, reflections from untreated floor and ceiling surfaces could be contributing to the issue, and I plan to address these over time as I balance the benefits with the effort required and update this post as I work on the issues.
Despite these challenges, I’m pleased with the overall performance of the speakers. Aside from the natural dip in the speaker’s response between 800-1000Hz, the only other issues with the sound are within the room’s modal region. This indicates that I need better or more acoustic treatment/speaker placement, rather than any fault with the speakers themselves.
Using Dynamic EQ
Since our hearing is volume-dependent, the playback system must be calibrated to both the original recording level and the current playback volume to preserve the intended tonal characteristics. Research shows that as volume decreases, we become less sensitive to bass frequencies and those above 10 kHz. However, people tend to notice the lack of bass more than the high frequencies. Many address this by adding a ‘static house curve,’ usually only to the bass region, which helps restore tonal balance at their most common listening volumes.
However, a ‘static house curve’ is just that—static—and doesn’t adjust to the volume you’re listening at. This would require different curves for different content types and listening volumes, making it impractical. Audyssey Dynamic EQ addresses this by allowing you to set the original recording level and dynamically adjusting the curve based on the listening volume, keeping the tonal balance no matter what volume you are listening at.
That said, I don’t agree with everything Audyssey Dynamic EQ does, particularly regarding surround volumes. When Dynamic EQ is enabled, Audyssey tends to boost the surround volumes, which I find too aggressive. To fix this, I play demo clips at my preferred listening volume and adjust the surround levels to a more balanced level, usually reducing them by 2 dB per channel for my Reference Level Offset (RLO) of 5. This helps prevent the surrounds from overpowering the main speakers.

Listen, Listen, Listen
As I continue my home theater journey, I’ve realized that listening tests during calibration aren’t just for verifying your work, they’re an integral part of the calibration process. Our ears are the ultimate judge of what sounds good, and calibrating solely by measurements misses half of the equation. However, this doesn’t mean relying only on your ears; it means that both your ears and measurements need to work together to achieve an excellent result. By listening and then measuring, you can train your ears to identify specific audio characteristics that can be corrected to the measurments.
For example, during my first listening test, I noticed that ‘S’ and ‘T’ sounds lingered too long, making some voices sound harsh which is a sensitivity of mine. Knowing these syllables often fall within certain frequencies, I reviewed the Audyssey results and saw that it was trying to correct a null in that region by significantly boosting those frequencies. To address this, I made two adjustments: I added a small notch in my target curve to discourage Audyssey from over-boosting, and I used the new smoothing function in MultiEQ-X to smooth out the region more aggressively, promoting the use of a broader filter. This eliminated the harsh sound caused by aggressive filtering.
My process involves conducting two types of listening tests: short-term and long-term. Short-term listening involves testing the audio calibration with familiar clips or songs. I go through a curated selection of tracks and demo clips that highlight specific audio characteristics, helping me detect subtle differences after making slight adjustments.
Long-term listening is about spending extended periods, typically longer than an hour, listening to varied content to identify any potential issues. For this, I often watch a movie I’ve seen before but don’t know by heart, allowing me to focus on the audio without being distracted by the plot.
These tests have significantly shaped my understanding of what I like and dislike in terms of audio, helping me develop the target curve I shared earlier. They are essential for dialing in your system to match your preferences.
Am I Happy with the LCR10 and SUB15?
Overall, I am very happy with these speakers and the baffle wall. They represent a significant upgrade from what I previously had. The speakers deliver clear sound, respond well to EQ adjustments, have a large dynamic range, and are highly efficient. The correctly positioned baffle wall has also been a major improvement. The audio now feels like it’s coming directly from the content itself, not the speakers, which improves immersion and allows me to forget about the speakers entirely while watching.
However, these speakers aren’t without their flaws. The LCR10 could benefit from improvements in its frequency response, as the low-frequency driver’s surround causes a dip between 800 Hz and 1 kHz. Additionally, some other adjustments could further improve their performance. For the SUB15, a more powerful driver would be beneficial in improving the SPL level, allowing it to reach lower frequencies and provide more headroom.
Identifying areas for improvement is a key part of our learning process, and we’re just getting started at SHC. I believe we’ve accomplished our goal of creating a truly modular speaker system that serves as a lasting investment, evolving and adapting for every user. We are committed to continuously improving these speakers over time. We have several upgrade paths in development for both the LCR10 and SUB15, and we’re also working on surround speakers that will be timbre-matched to the LCR10. Stay tuned—there’s much more to come!
If you have any suggestions for upgrades to the LCR10 or SUB15, please let us know in the comments below or contact us directly through our Contact Page.
Author’s note: This journey of designing, developing, building, and testing speakers has been incredibly fulfilling for me. As an engineer at heart, I love learning and creating things. Combining my engineering skills with my passion for home theater has been extremely rewarding, and I look forward to continuing this journey.
Discover more from Simple Home Cinema
Subscribe to get the latest posts sent to your email.
Leave a Reply