

If you are into high-end home theater, check out our Display and Audio Calibration Guides to maximize your experience.
Intro
While the Audyssey MultEQ Editor app provides an opportunity to fine-tune Audyssey calibrations at a justified $20 USD price tag, it has drawn criticism from enthusiasts for omitting essential functions and for its challenging user experience. I echo these sentiments. Fortunately, a solution exists to address the missing features, which involves directly editing the code of the measurement file. In this article, I will walk you through the process of exporting/importing the Audyssey measurement files and how to understand the code. In future articles, we might delve deeper into the process of how to edit the code for each section.
What prompted me to discover this process is the difficulty I faced while attempting to adjust the custom target curve within the app. The process of dragging the curve with your finger makes it challenging to achieve precise adjustments, and often the curve does not respond as expected. This is really frustrating when you want to make small corrections to your response curve. So I had to figure out a better way.
This method is tailored for individuals who desire advanced audio customization beyond what Audyssey and the app offer. It serves as a complement rather than a replacement. We recommend that before diving into this advanced audio calibration approach, you first attempt to achieve satisfactory results using Audyssey and the app on their own. For assistance, we recommend following our “Secrets of Audyssey Guide,” where we provide tips on maximizing your Audyssey experience. Alternatively, look at our free guide on Configuring Audyssey – The Right Way, as establishing a good baseline is essential before starting to customise the base curve.

At the time when I discovered this method, MultEQ-X had not been released yet, which meant there was no option to edit the target curves or measurements directly within Audyssey, unless you somehow acquired the Audyssey Pro Kit. Even with MultiEQ-X released, this method remains a cost-effective alternative, albeit slightly more complex.
Code Editing Benefits
Before we dive into the process of how to export and read the code, I would like to highlight the key features that this method aims to add or improve on the app.
- Fine-Tuning Target Curves: If you have used the app, you have probably experienced the challenge of achieving your desired custom target curve. The process relies on how accurately the app recognizes your finger, which is limiting on a phone or tablet. However, by editing the code, you can input your own target curve exactly, and there seems to be no limit to the number of correction points you can add. As a reference, I attempted to upload 450 custom points without encountering any issues. This is the real main benefit of this method, as you can make the frequency response exactly to your liking.
- Editing Individual Target Curves: Currently, you can adjust target curves for pairs of speakers, but not for individual speakers. It is somewhat puzzling why the option to modify the target curve is limited to pairs of speakers rather than offering the flexibility to adjust each speaker individually. Nevertheless, with the option to directly edit the code, we have the flexibility to tailor each speaker’s target curve to make sure you get the response you want.
- View/Edit Individual Measurement Responses: One of the app’s notable shortcomings is the inability to access all individual measurements taken; instead, it presents combined measurements for each speaker on a graph that can be challenging to decipher. However, through code editing, we gain the ability to view and edit these measurements. It is worth noting that editing these measurements can be tricky since Audyssey correction algorithms are specifically designed for the Audyssey mic. I primarily use this capability to look at Audyssey’s measurements, helping me identify potential acoustic issues in the room or use it to identify any bad measurements.
The list above does not cover all of the possible changes you can make when editing the code, but it focuses on the most beneficial ones. In reality, you have the flexibility to modify virtually every auto-calibration setting within the code.
Exporting the Audyssey Measurement
Once we have taken our Audyssey measurement we would like to edit, we need to export the file to a computer in order to read the code.
To export the file, all that needs to be done is to send a copy of the file to a place where you can access it on a computer. To do this, click the icon that is used to send the file to the receiver, but instead of clicking “Send to AV receiver” you are going to click “Send a Copy.” This will provide you with various options to export and send the file through your preferred method.

Viewing the Exported File
Now that we have the exported file on a computer, the next step is to find a way to view and edit it. Audyssey uses a custom file extension, .ady, which will not be recognized by your computer. Fortunately, the .ady file extension is essentially a .json file type. This means that any program capable of editing .json files can be used to edit the code. There is a free online editor available for viewing and editing .json files, but in theory, any program that can edit .json files should work.
Here is the link to the code reader: JSON File Editor
Please be aware that this is a no-cost tool that someone devoted time and effort to develop, so we kindly request that you disable your ad blocker or consider making a donation to support the website. Tools like this are invaluable, but they rely on financial support to remain operational and free.
Deciphering the Code
When you open your measurement, the image below is what you will encounter and is a collapsed view of the code. While the values will differ, the structure and fields (colored in blue) should remain consistent. In this guide, I will point out the most common fields that you may want to work with.
It is important to note that I will not mention every field, as most of them will not require any adjustments in the code. In fact, many are more conveniently modified within the app itself. You will find that only a handful of fields necessitate code-level editing or are easier to manage in this coding environment.
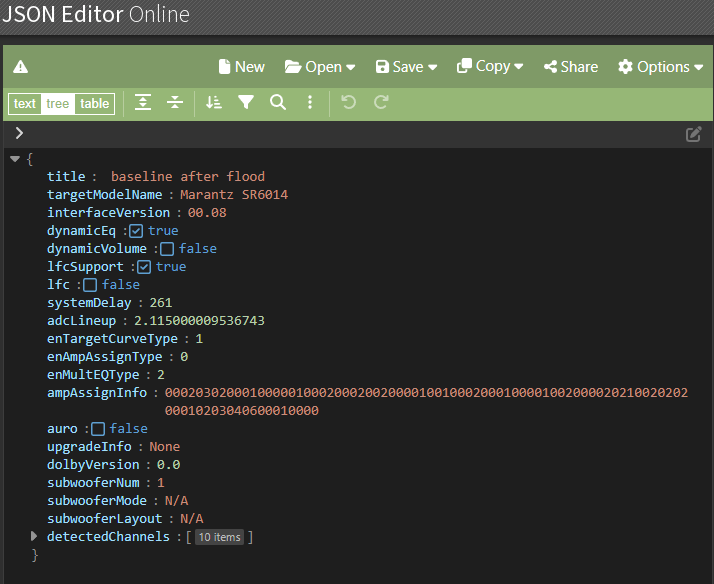
- Title: The name of the file within the app.
- Target Model Name: The processor on which the measurement was conducted.
- DynamicEQ: Indicates whether Dynamic EQ is enabled or disabled.
- DynamicVolume: Shows whether Dynamic Volume is activated or deactivated.
- LFC: Indicates whether Low Frequency Containment feature is enabled or disabled.
- DectectedChannels: In this dropdown, you will find all the information about each speaker channel. This section is where you will likely need to make the most edits.
Detected Channels
While you make the your edits in this section, you will find details on not only each sound channel, but also the subwoofers as well which are listed last in the series. In my example, I have 9 speaker channels plus 1 subwoofer.

- Command ID: Identifies the specific speaker to which this section refers.
- Response Data: Contains all the measurements captured by Audyssey, 1 prop for each location measured. Analyzing and editing the response data is beyond the scope of this article, but we intend to create a guide for this in the future, if there is demand for it.
- Midrange Compensation: Indicates whether Midrange Compensation is activated or deactivated.
- Frequency Range Rolloff: Filter Frequency range, cut off frequency for Audyssey.
- Custom Distance: Represents the user-inputted distance in meters, which can be modified to adjust the speaker’s delay.
- Custom Level: Signifies the user-inputted gain, which can be adjusted to fine-tune the channel’s volume. Note, this field will say Null if you have not changed it from what Audyssey measured.
- Custom Crossover: Indicates the crossover setting for the channel. Note, this field will not appear if you have not changed it from what Audyssey measured before exporting.
- Custom Target Curve Points: Here is where you can integrate custom points into the target curve. The detailed process is beyond the scope of this article, but we plan to create a guide on this in the future. For now, we have included an example of the format required for the app to recognize custom points at the end of this article, or you can click here for the template (link takes you to the end of this article so remember to scroll back up).
Syntax
Just like in all programming languages, it is essential to understand the syntax of that coding language, and this is no different. It is easy to forget a bracket, colon, or indent, so be careful while editing, otherwise the Audyssey app will not recognize the file when you try to import it. We might get into this deeper in our future guides about how to modify the sections, but for now just be mindful of the changes you make.

Saving and Importing
Once you have made all the edits that you want to make, saving and importing the file back into Audyssey is fairly straightforward, with one notable exception: the file extension. When you edit the code in a .json editor, the file will be saved by default with a .json file extension, which the Audyssey app will not recognize.
To rectify this, you need to change the file extension type. The simplest way to do this is when saving the file to your computer, manually delete the .json text and replace it with .ady. Also, in the “Save as type” field, change it to “All Files,” using the picture below as reference. This adjustment will ensure that the file can be correctly recognized and read by the app.

To import the file back into the Audyssey app, you must save it in a location accessible to the app. The app offers two options: Google Drive or the device’s storage. I prefer using Google Drive, as it eliminates the need to connect my phone to my computer for file transfer.
Once the file is saved in an accessible location, within the app click on the plus icon in the top left corner to initiate the file import process. After selecting the correct file, it should take a few seconds to load in. Once loaded, you can then send it to your AVR, and you should be ready to go.

In the Future
This article serves as an overview of the process to access the Audyssey app code, demonstrating that it is possible to improve the shortcomings of the app with a little creativity and coding. In the future, we will delve into the integration of custom curves created in REW with the Audyssey app using the method described here.
If you encounter any difficulties with the steps mentioned above, please do not hesitate to leave a comment below, or reach out to us via email.
Thank you for reading. If you are into high-end home theater, do not forget to check out our Display and Audio Calibration Guides to maximize your experience.
Template For Custom Curve Points
Please click for example code: each line represents one custom point to be added. (Freq, dB)
[
“{0, -0.092}”,
“{20.299999, -0.108}”,
“{20.6, -0.126}”,
“{20.9, 0.143}”,
“{21.200001, 0.16}”,
“{21.4, 0.171}”,
“{21.799999, 0.194}”,
“{22, 0.206}”,
“{22.4, 0.233}”,
“{22.700001, 0.255}”,
“{23, 0.278}”,
“{23.299999, 0.304}”,
“{23.6, 0.333}”,
“{24, 0.376}”,
“{24.299999, 0.413}”,
“{24.700001, 0.469}”,
“{25, 0.519}”,
“{25.4, 0.595}”,
“{25.799999, 0.686}”,
]
Discover more from Simple Home Cinema
Subscribe to get the latest posts sent to your email.
Any chance to use the app with the “Audyssey MultEQ Pro Sound Equalizer EQ”
or info on the desktop .csv filter file editing (bands width and dB limits)?
Hello Johan, I’m afraid the mobile app may not be compatible with the “Audyssey MultEQ Pro Sound Equalizer EQ” device. As far as I know, it’s designed to work exclusively with its software installed on a PC. However, I haven’t personally used one, so I might not be the right resource to answer your question. You may be able to find more information and get your question answered on AVS forums, sorry I could be more help. Here is the link: https://www.avsforum.com/
Brilliant write up, Tyler, well done!
I’ve made a web editor, where you can adjust all that mentioned parameters:
https://audyssey.pages.dev