

Intro
With the imminent upgrade of speakers and subs on the horizon, reorganizing my AV rack has become a necessity. This is the process that I went through planning and designing the update. Hopefully you are able to take away some helpful tips to create your own organized and fully functioning AV rack.
Planning
Planning ahead is crucial when it comes to designing an AV rack. It is a project that involves a lot of components while managing a lot of cables. Having a solid plan in place helps to stay on track, anticipate any challenges, and find solutions before they become problems.
With a well-thought-out design, you can make sure you have enough space for all of your equipment, consider proper ventilation, and organize those cables in a way that minimizes clutter. Plus, a good layout makes troubleshooting easier and allows for future upgrades.
With this in mind, my advice is to take the time to plan it all out so you will have a functional, efficient, and impressive AV rack that suits your needs perfectly.
Determining the Rack Contents
The first step involved in planning was to create a list of all the components that will reside in the rack. This encompassed major elements such as the AV Receiver, amps, fans, and media players, as well as minor items like smart home hubs, power strips, switches, WIFI routers, and more. Additionally, it was important to keep note of how many rack shelving units are needed to support components that are not rack mounted.

List of equipment and quantities that will be included on my rack
Pro Tip: When using rack shelves, it is advisable to select those with ventilation in order to maintain adequate airflow throughout the rack. I personally recommend a particular type of adjustable and robust shelf that you can find here. If you’re looking for a more budget-friendly option, click here.
Another crucial factor to consider when listing the equipment is potential future expansion. It is a good idea to leave space for future amps or larger components, as you wouldn’t want to overhaul your AV rack every time you decide to upgrade or add another device. Learn from my mistakes as this is the reason for planning my own overhaul.

Vertical Space Needed
Once the list of equipment was compiled, the next important step was to determine how much vertical space each component requires and plan where they will be positioned within the rack. To figure out the height needed for each component, each item was measured, taking into account factors like airflow requirements and accessibility.
Once the height measurements are known, it is helpful to convert them into standard rack Units (U) for easier planning. To do this, divide the measured height of each component by 1.75 inches (44.5mm) and round up to the nearest whole unit. This calculation will be the required vertical rack space for each component and help determine the total amount of rack height needed.
A standard rack Unit is equivalent to 1.75 inches (44.5mm) and typically has 3 mounting holes per Unit. This industry-wide standardization ensures that parts are made uniformly, regardless of the manufacturer. For example, a rack-mountable amplifier will fit into a standard 19-inch width rack with at least 2 mounting holes per side, regardless of its manufacturer. This standardized approach simplifies the process of selecting and arranging components within the AV rack, making it easier to achieve a well-organized and functional setup.
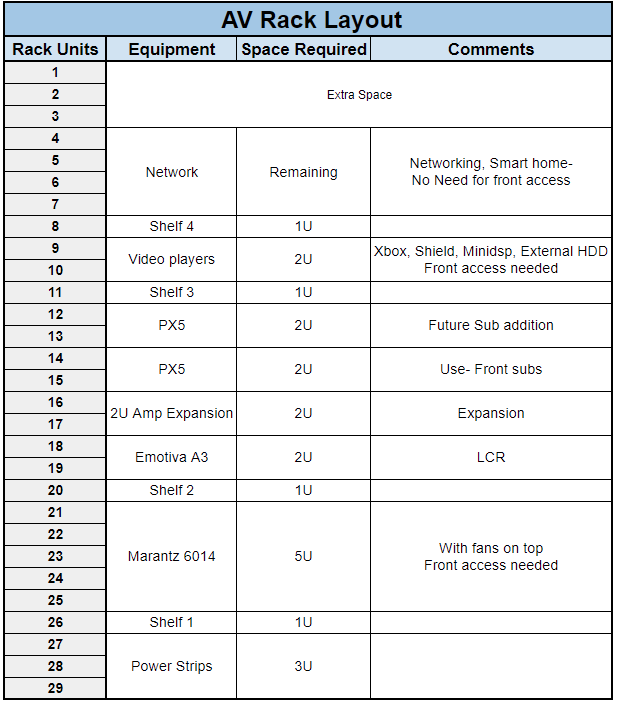
I have included a picture of my spreadsheet below as an example:

Based on the above chart, I needed a rack that is at least 26U or 38.75 inches tall. Luckily, the rack I have is 29U, so there is no need to get a new one.
Component Layout
Now that sizing requirements have been figured out, the next step in the process was to determine the layout of the rack, i.e., where components will be placed and at what level of the rack.
Grouping Components
A good practice is to group similar components together. Examples of groupings can include amps, media players, networking devices, audio equipment, and visual equipment. There is no definitive rule for grouping, but the key is to create logical groupings that make sense to you.
For my groupings, I chose to group by audio equipment, media players, and networking. My goal was to keep each group near each other within reason.
Consider Heavy Components
It is generally recommended to place heavier components near the bottom of the rack. This helps stabilize the rack and prevents it from becoming top-heavy. By keeping heavier items at the bottom, you also reduce the risk of damaging other equipment in the case that a shelf or support were to fail.
Cooling
Cooling is another major consideration when looking at rack layout. Proper cooling is crucial for maintaining optimal temperatures and preventing heat-related issues. Heat can cause permanent damage and reduce the lifespan of AV equipment. To ensure effective cooling, consider both passive and active cooling methods when building out the rack. As a general rule of thumb, ensure that any vents on the equipment are able to get airflow and that the most sensitive heat components are near the bottom to get fresh cool air.
We dive much deeper into rack cooling and give some effective ways to both actively and passively cool av equipment, in our article How to Keep Your AV Equipment Cool: Passive and Active Cooling Methods.
Human Interaction
When determining the height placement of each component, it is important to consider if a person needs to interact with the equipment. For example, if you have a Blu-ray player that requires disc changes, it would be wise to place it at a height that is easily reachable. Placing such a component near the ceiling would be impractical and inconvenient.
Pro Tip: To determine the appropriate height placement for a component, experiment by placing the component at different heights within your reach and see which height feels most comfortable for interaction. Then, measure the distance from the ground to that height. This will give you an indication of the approximate height at which the component should be positioned in your rack.
I had to pay extra attention to component height due to the fact that my rack is going on top of a 30 inch tall counter and I quickly would get to a point where I would not be able to reach certain areas without a step stool (I’m not a tall person). I made the decision to push the media players above the audio equipment, which put it at a height of about 66 inches off the ground. This is a little high for my liking but I would rather keep all of the audio amps together while getting as much cool airflow as possible. See my final rack layout in the picture above.

Cable Management
Now, let’s delve into the often dreaded task of cable management, which can be both time-consuming and challenging. However, despite its tedious nature, it is an essential step in organizing AV racks. Proper cable management is crucial to prevent cable clutter and promote efficient equipment management and troubleshooting. To achieve this, consider the following key techniques for effective cable management:

- Utilize reusable cable ties: Use cable ties or Velcro straps to neatly bundle and secure cables together. This helps to maintain a tidy appearance and makes it easier to identify and trace specific cables when needed. Reusable cable ties allow for flexibility and adjustments as your setup evolves.
- Label wires and use color coding: Labeling cables with tags or adhesive labels provides clear identification, making it easier to distinguish between different connections. Additionally, implementing a color-coding system can further enhance organization and facilitate quick visual identification of cables for specific purposes or devices.
- Ensure adequate cable slack: Allow sufficient slack in cables to provide flexibility when working on individual equipment or making adjustments. This extra length prevents strain on the cables and minimizes the risk of accidental disconnection or damage while accessing devices within the rack. This includes if your rack is pushed up against a wall as you might need to move the rack out to get behind it for maintenance.
- Minimize strain on wires: Avoid placing excessive tension or weight on cables, as this can lead to cable fatigue and damage over time. Route cables in a way that minimizes sharp bends, twists, or pinch points. Proper cable management accessories such as cable management racks, loops, or clips can assist in relieving strain and maintaining cable integrity.
- Separate power and signal cables: Keep power cables and signal cables separated to minimize the potential for electromagnetic interference. Crossed or bundled power and signal cables can introduce noise or degrade signal quality. Maintaining a physical separation between power and signal cables helps to mitigate these issues.
Final Thoughts
Creating and keeping an organized AV rack is not a pleasurable task for most people but doing it right will save you a lot of effort as your system grows and evolves over time. Hopefully, the advice above will help better equip you for the next system that you set up.
In regards to my system, my goal is to use what I have planned above to create a well organized rack. I now just have to find the time to tear my current setup apart.
If you have any questions about how to design your home theater rack, feel free to leave a comment or book some time with us. See more about it here, or by clicking below.

Discover more from Simple Home Cinema
Subscribe to get the latest posts sent to your email.
Leave a Reply